Inventory Transactions
Inventory transactions represent movements of Inventory Item from one location to another. Normally, the process consists of four steps:
- User request the Items to the Store.
- Request will go for approval.
- Once request is approved by the authority request will come to the inventory admin.
- Inventory admin will take further action on it. ( Issue / Reject the request )
Roles
Inventory Admin
Path
Inventory Transactions
Functionality
- Admin have the provision to upload using excel or enter organizational existing inventory data from UI in to the system. Once the system is use by the organization new entries will be done by the GRN Process.
- Inventory admin have the access to see current stock as on date as well as Admin can see or edit the product details.
- As per Reorder quantity level configuration user will be alerted by the system that the item is below reorder level / Maximum level / Minimum level etc… To identify this level system is using different colour coding.
- Admin can filter out the inventory stock based on different status maintained by the system (E.g. Available Stock, Category wise, Near Expiry and Overall Stock)
- Inventory admin have the provision to allocate the inventory items without requisition.
- Inventory admin can able to allocate the inventory items against the request. Once inventory requisition is accepted by employee’s sectioning manager request will come to inventory admin and Inventory admin have the authority to Accept or Reject that requisition.
- JUNO Campus have the functionality to accept the requisition without allocating items. Admin can accept the request and later he can allocate.
- If item is not available in the stock, Inventory admin can add those items in the draft for further references which will be useful while Purchase requisition.
- Admin have the access to view Pending, Accepted, Allocated or Rejected Requisition.
- User have the provision to Return or Reject the issued inventory item, Once the user has returned the issued inventory item Admin has to accepted the request from Transaction Report UI
- Admin have the access to see the consumed, Issued, Rejected Item list
Screen Shots / Steps
Inventory Transactions
- Base product wise current stock details will be available for admin. - Admin can Issue the inventory against the request or Allocate directly to the user.
- To indicate the the stock quantity system using different color which is highlighted for Admin.
- Same way for Near Expiry and Expired Items system is indicating in colors which is highlighted.

- Current Stock ( as on date )
- Adding Item Details Using Form
- Non purchased item from the system can be added by the admin.
- Admin have the provision to add product details using form or can be uploaded by the excel.
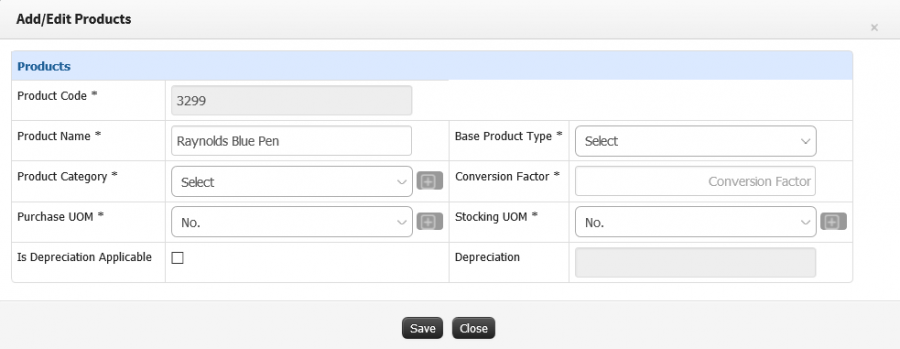
- To add product details click on Add New Product Item button.
- Enter the purchase details and click on Add Product Item button.

- Once the admin clicked on add product item button.
- Adding product item Form will be visible.
- Enter all product details and click on Confirm item button one by one.
- Once all item details updated, Item list will be visible and finally click on Save product items button.

- Upload product details using Excel
- Admin have the provision to upload all the product details using excel.
- To upload product details first download template by clicking on Click Here hyperlink.
- Fill all the details in the template and Click on Upload excel sheet button.
- Admin can select the filled excel and upload.

Current Stock as On Date
- Admin can check the as on date stock for the products available under base product category.
- To check the stock quantity click on base. E.g. Stationary
- You will get all product details which are available in the stock with minimum, maximum quantity reorder level and reorder quantity details which are mentioned in the reorder level quantity configuration UI. ( Configuration » Reorder Levels and Quantity / Configuration )
- System is indicating the stock quantity in different color coding.
- To search the particular product user can click on search button and search the product.
- Admin can filter product list using the filter which are available in the system like category wise, Near Expire products, Overall stock.
1) Available Stock

2) Category Wise
- To check category wise product list click on category wise radio button. - Select category, It will show you the quantity under that category.

- If you want to check total list of the product click on arrow. Product list will be visible to you.

3) Near Expiry
- To check the near expiry product list go to the near expiry products section.

4) Overall Stock
- To check the overall stock click on overall stock radio button. - To check particular product details select product from the drop down.

- If admin want to check Nill Quantity product list click on Nill Qty. Button.

Product details
- Admin have the provision to check the product details.
- To check the product details click on arrow from that product name. Product details will be visible.
- Admin have the access to edit the product details. To edit the details click on setting icon and click on Edit Button.

Edit Product Details

- Adhoc Issue of Inventory
- Admin have the provision to issue inventory without request which can be used by the admin in Emergency case where request cannot be processed by the user.
- Admin can check previous inventory allocation by selecting dates.
- Admin can check inventory for particular employee by searching employee name in searchable text box.

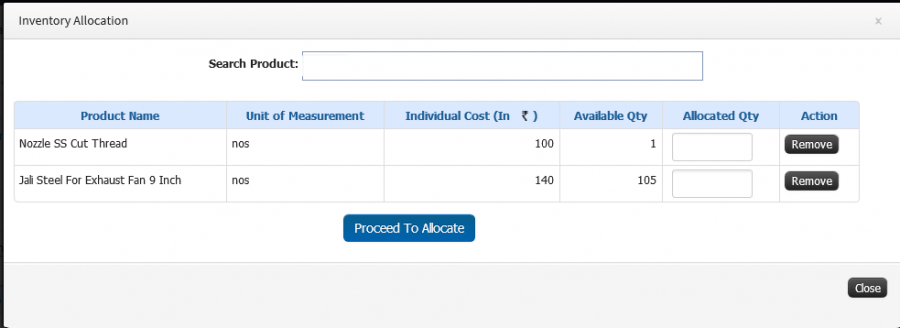
- To issue the inventory click on Allocate Inventory Button.
- Type product name in search product searchable textbox and select the product from the list.
- Enter the allocated quantity and click on proceed to allocate button.

- Enter the employee name to whom you want to issue the inventory.
- Select the Transaction Type, Enter the Reason of transaction and condition of product.
- Once you filled all the details click on Issue button.

- Admin will be alerted once the new inventory request comes to the admin.
- Pending request count will show in Issue Inventory against Request Tab in red color.
- There are request separation in two tab based on consumable and non consumable items.
- Initially Inventory request will be in pending section.
Pending
- Admin can see all the pending request, To check the request details click on view details button.

- Admin can view the all requested product list and requested quantity, available quantity, allocation quantity.
- Admin have the provision to reject the request, To reject the request click on Reject Request button. Request will be visible in Rejected section.
- If user added any product in Not in List system will restrict admin to accept or Allocate inventory.
- Admin can configure that product in the system, can replace with existing product or admin can reject the product.

- To configure the product in the system click on action button and select the add to product option.
- Enter all the details and click on save button.

- Replace the product with existing product click on action button and select the Find and Replace with option.
- Select the product from the list which you want to replace.

Accepted
- Accepted request will be visible in Accepted Section.
- To check that click on Accepted radio button. Admin can see the requisition details by clicking view details button.
-

- Admin have the provision to reject the inventory request after accepting. Click on View details button and then click on Reject Request Button.
- Enter the reason and click on save to proceed further.
- To allocate the accepted request click on View details. It will show you the status as accepted / Added in draft. - To allocate the inventory click on allocate button.

- Enter the allocated quantity and click on proceed to allocate button.

Allocated
- Allocated requests will be visible in Allocated Section.
- To check that click on Allocated radio button. Admin can see the requisition details by clicking view details button.

Rejected
- Rejected requests will be visible in Rejected Section.
- To check that click on Rejected radio button. Admin can see the rejection reason and requisition details by clicking view details button.

- Transaction Report
