|
|
| (2 intermediate revisions by one other user not shown) |
| Line 1: |
Line 1: |
| − | == '''Roles''' == | + | == Employee Login == |
| − | Staff/Faculty
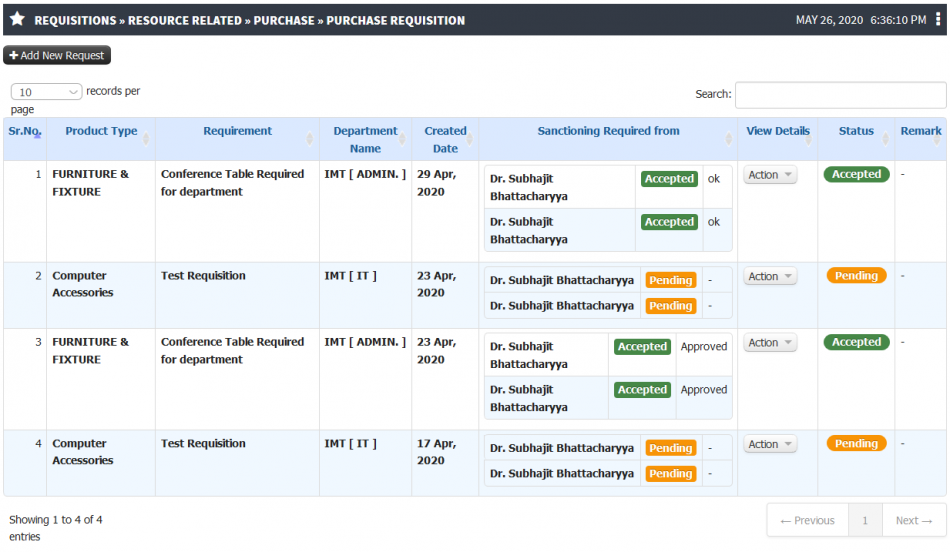
| + | The configuration is given for raising the purchase requisition from employee login. Unique PRN (Purchase Request Number) will be generated for each purchase request. |
| | | | |
| − | == '''Path''' == | + | == Prerequisite == |
| − | Requisitions » Resource Related » Inventory » Inventory Requisition
| + | * Institute renewal policy should be defined |
| | + | * PSI(Purchase, Stock and Inventory) policy should be created |
| | | | |
| − | == '''Functionality''' == | + | == Roles == |
| − | - User can able to raise inventory requisition. Once requisition accepted by sanctioning authority and Inventory admin Inventory admin will allocate the inventory.
| + | * Faculty |
| | + | * Staff |
| | | | |
| − | - Employee have the provision to accept or reject Issued Inventory
| + | == Path == |
| | + | Requisitions » Resource Related » Purchase » Purchase Requisition |
| | | | |
| − | - Without accepting issued Inventory employee cannot raise new Inventory requisition.
| + | == Functionality == |
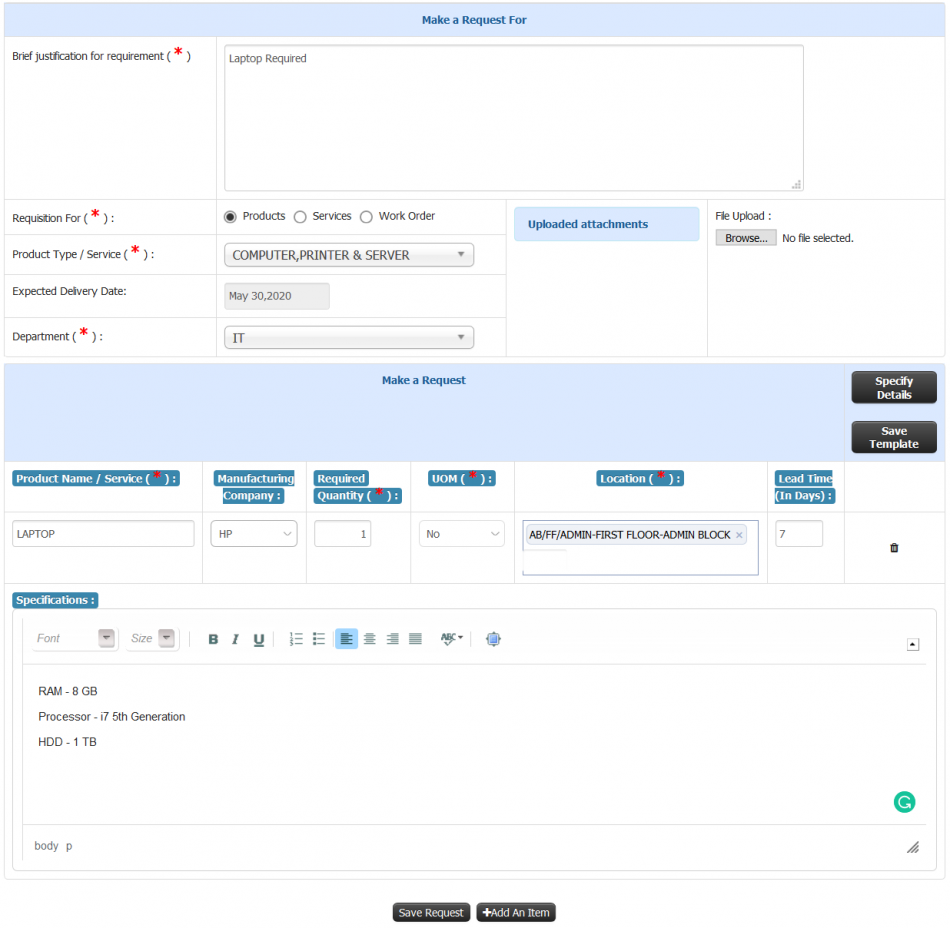
| | + | * Add new purchase request. |
| | + | * Unique PRN No. generated for purchase request. |
| | + | * View list of raised purchase request. |
| | + | * Edit saved purchase request. |
| | + | * Saved purchase request can be post for authority approval. |
| | + | * Requisition status can be tracked. |
| | | | |
| − | - Employee can able to view Inventory transaction history.
| + | == Step by Step == |
| | + | Purchase Requisition |
| | + | [[File:Employee Login.png|center|frameless|950x950px]] |
| | | | |
| − | - Employee can monitor the requisition status. (Pending/ Accepted/ Allocated/ Rejected)
| + | Add new request |
| − | | + | [[File:Employee Login1.png|center|frameless|950x950px]] |
| − | - Employee can see the Overall allocated Inventory item.
| |
| − | | |
| − | - Employee have the provision to raise requisition for the Item which are not available in system.
| |
| − | | |
| − | - Employee have the provision to return the Inventory to the Inventory admin.
| |
| − | | |
| − | - Employee can show the consumption of the Inventory item.
| |
| − | | |
| − | == '''Screen Shots / Steps''' ==
| |
| − | '''Pending Transaction'''
| |
| − | - In pending transaction user can Accept or Reject allocated inventory.
| |
| − | [[File:Inventory requisition.png|border|center|frameless|900x900px]]
| |
| − | - To make new inventory requisition go to the My Inventory requisition section.
| |
| − | - User can see the pending Accepted and Allocated or rejected Requisition.
| |
| − | [[File:My Inventory.png|border|center|frameless|900x900px]]
| |
| − | - Click on Make New Requisition button.
| |
| − | - Select Transaction Type and search the product name in searchable textbox.
| |
| − | | |
| − | - Select the Product from the list and enter required Quantity, Reason of transaction and click on '''Request Inventory''' button.
| |
| − | [[File:Requisition Inventory.png|border|center|frameless|900x900px]]
| |
| − | '''Not in List'''
| |
| − | | |
| − | - Not available Item can be added in '''Not in list'''
| |
| − | | |
| − | - To add product click on '''Not in List''' hyperlink.
| |
| − | | |
| − | - Textbox will be enable, Enter product name and click on Add new Button.
| |
| − | | |
| − | - Once product added select UOM, Product type ( Consumable/ Non-Consumable ) and Required Quantity.
| |
| − | | |
| − | - If any modification has to be done in the product name after adding click on delete button.
| |
| − | [[File:Not in List.png|border|center|frameless|900x900px]]'''Pending Requisition'''
| |
| − | | |
| − | - Once request is submitted by user, then request status can be viewed by user on same UI.
| |
| − | | |
| − | - It will show the product details and sanctioning authorities name.[[File:Pending Requisition.png|center|frameless|900x900px]]
| |
| − | | |
| − | '''Accepted Requisition'''
| |
| − | | |
| − | - User have the provision to check the accepted requisition by admin.
| |
| − | | |
| − | - To view the accepted requisition details click on '''View Details''' button.
| |
| − | [[File:Accepted Requisition.png|border|center|frameless|900x900px]]
| |
| − | '''Allocated Requisition'''
| |
| − | | |
| − | - User have the provision to check the Allocated requisition by admin.
| |
| − | | |
| − | - To view the allocated requisition details click on '''View Details''' button.
| |
| − | [[File:Allocated Requisition.png|border|center|frameless|900x900px]]
| |
| − | '''Rejected Requisition'''
| |
| − | | |
| − | - User have the provision to check the Rejected requisition by admin.
| |
| − | | |
| − | - To view the Rejected requisition details click on '''View Details''' button.
| |
| − | [[File:Rejected Requisition.png|border|center|frameless|900x900px]]
| |
| − | | |
| − | '''After Submitting The Inventory Requisition'''
| |
| − | | |
| − | - Once the requisition is submitted by user it will go for approval to the sanctioning authority.
| |
| − | | |
| − | - After approval from sanctioning authority request will go to the inventory admin and inventory admin can take decision weather he wants to issue products or he wants to only accepted and issue product later, He can perform the action accordingly.
| |
| − | | |
| − | - Once the inventory requisition is accepted by admin and issued the product user has to accept the allocated product from his login.
| |
| − | | |
| − | - Pending inventory product will be shown in pending acceptance.
| |
| − | | |
| − | - To accept or reject the inventory product select the product and click on Accept All Selected / Reject All Selected.
| |
| − | | |
| − | - User have the provision to Accept / Reject product individually or multiple.
| |
| − | [[File:Pending Acceptance.png|border|center|frameless|900x900px]]
| |
| − | | |
| − | '''Transaction History'''
| |
| − | | |
| − | - User have the provision to check the total consumption made by him.
| |
| − | | |
| − | - To check total consumption click on Transaction history Tab and select the dates and click on consumed inventory.
| |
| − | | |
| − | - Same way user can check total Issued Inventory.
| |
| − | | |
| − | [[File:Transaction history.png|border|center|frameless|900x900px]] | |
| − | | |
| − | '''Overall Allocated Inventory'''
| |
| − | | |
| − | - Employee Can return the inventory. The return inventory request goes to the inventory admin and Once it is accepted by Inventory admin. It will reduce the stock from the employee’s name.
| |
| − | | |
| − | - Employee Can show the consumption of the inventory product (Used / Scraped)
| |
| − | | |
| − | [[File:Overall Allocated.png|border|center|frameless|900x900px]]
| |
| − | | |
| − | - To check the Allocated inventory details click on the Arrow of that product name.
| |
| − | | |
| − | [[File:Allocated details.png|border|center|frameless|900x900px]]
| |
| − | | |
| − | '''Return Inventory Item'''
| |
| − | | |
| − | - To return the allocated inventory click on Action button and select the return option.
| |
| − | | |
| − | - Enter the Return Quantity, Reason and condition of product and save the details.
| |
| − | [[File:Inventory Return.png|border|center|frameless|900x900px]]
| |
| − | | |
| − | '''Mark Inventory status as Used'''
| |
| − | | |
| − | - User can show the consumption of product.
| |
| − | | |
| − | - To show the product is used click on action button and select the used option.
| |
| − | | |
| − | - Enter the Used Quantity and save. Used quantity will be shown in the consumption.
| |
| − | [[File:Inventory Used.png|border|center|frameless|900x900px]]
| |
| − | | |
| − | '''Mark Inventory status as Scraped'''
| |
| − | | |
| − | - If allocated product neither been used nor returned and if it was not in the condition to use. User can show those products in scraped.
| |
| − | | |
| − | - To scraped the product click on action button ans select scraped option.
| |
| − | | |
| − | - Enter the Scraped quantity and save.
| |
| − | | |
| − | [[File:Scraped Inventory.png|border|center|frameless|900x900px]]
| |

