Difference between revisions of "Inventory requisition and purchase"
(→Screen Shots / Steps) (Tag: Visual edit) |
(-) (Tag: Visual edit) |
||
| Line 8: | Line 8: | ||
== '''Functionality''' == | == '''Functionality''' == | ||
| − | + | * Inventory admin can create the Indent for purchase of inventory item | |
| − | + | * In indent admin can add drafted item directly from the list available in draft. | |
| − | + | * New product can be created from the admin on same UI. | |
| − | + | * Admin can view the Indent Status (Accepted / Rejected) | |
| − | |||
| − | |||
| − | |||
== '''Screen Shots / Steps''' == | == '''Screen Shots / Steps''' == | ||
'''Inventory Requisition and Purchase''' | '''Inventory Requisition and Purchase''' | ||
| − | + | * In process indent will be shown in '''In-Process Indent''' tab. | |
| − | |||
| − | |||
[[File:Indent.png|border|center|frameless|900x900px]] | [[File:Indent.png|border|center|frameless|900x900px]] | ||
'''Create New Indent''' | '''Create New Indent''' | ||
| − | + | * To create indent first select the base product from the drop down and click on '''create new indent''' button. | |
| − | + | * To Add product in the indent search the product name in searchable textbox and select the product from the list. | |
| − | + | * Enter order Quantity and manufacturing company name for all selected product. | |
| − | + | * Enter expected delivery date and save the indent. | |
| − | |||
| − | |||
| − | |||
| − | |||
| − | |||
[[File:Indent 1.png|border|center|frameless|900x900px]] | [[File:Indent 1.png|border|center|frameless|900x900px]] | ||
'''Drafted Item''' | '''Drafted Item''' | ||
| − | + | * For purchase indent user have the provision to add product in the draft on Inventory Transaction UI. | |
| − | + | * Already drafted product can be added in the purchase indent. | |
| − | + | * To add drafted products click on '''add product from draft''' button. | |
| − | + | * Select the product which needs to be added in purchase indent and click on add button. | |
| − | |||
| − | |||
| − | |||
| − | |||
[[File:Drafted Items.png|border|center|frameless|900x900px]] | [[File:Drafted Items.png|border|center|frameless|900x900px]] | ||
'''Add new Product''' | '''Add new Product''' | ||
| − | + | * If any product is not configured in the system then user can directly add product from the same screen instead of going back to the Configuration » Product Add/Search/Edit. | |
| − | + | * To add new product in to the system click on '''Add new product''' button. | |
| − | + | * Fill all the required details and click on save button. | |
| − | |||
| − | |||
| − | |||
| − | |||
[[File:Base product from purchase indent.png|border|center|frameless|900x900px]] | [[File:Base product from purchase indent.png|border|center|frameless|900x900px]] | ||
'''Rejected Indent''' | '''Rejected Indent''' | ||
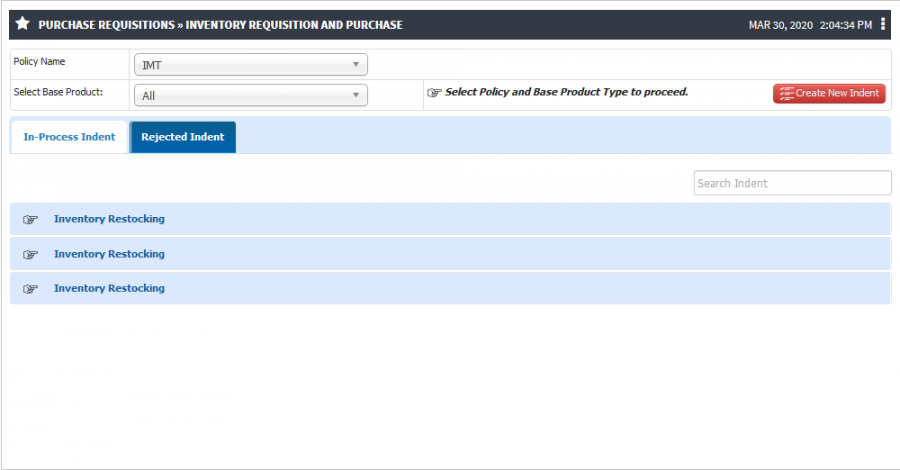
| − | + | * To check the rejected Indent list click on '''Rejected Indent''' tab. | |
| − | |||
| − | |||
[[File:Rejected Indent.png|border|center|frameless|900x900px]] | [[File:Rejected Indent.png|border|center|frameless|900x900px]] | ||
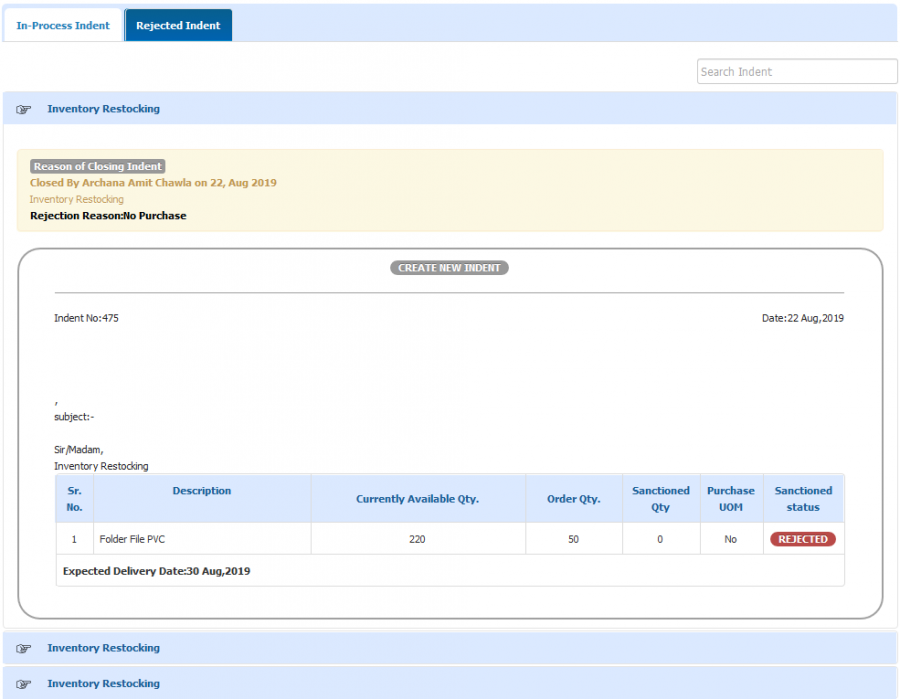
| − | + | * To check the reason of rejection and indent details click on the indent hyperlink. | |
| − | |||
| − | |||
[[File:Indent 123.png|border|center|frameless|900x900px]] | [[File:Indent 123.png|border|center|frameless|900x900px]] | ||
Latest revision as of 15:12, 14 April 2020
purchase indent is an internal organizational request in the purchasing process to authorize the requisition of materials prior to initiating a purchase order.
Roles
Inventory Admin
Path
Purchase Requisitions » Inventory Requisition and Purchase
Functionality
- Inventory admin can create the Indent for purchase of inventory item
- In indent admin can add drafted item directly from the list available in draft.
- New product can be created from the admin on same UI.
- Admin can view the Indent Status (Accepted / Rejected)
Screen Shots / Steps
Inventory Requisition and Purchase
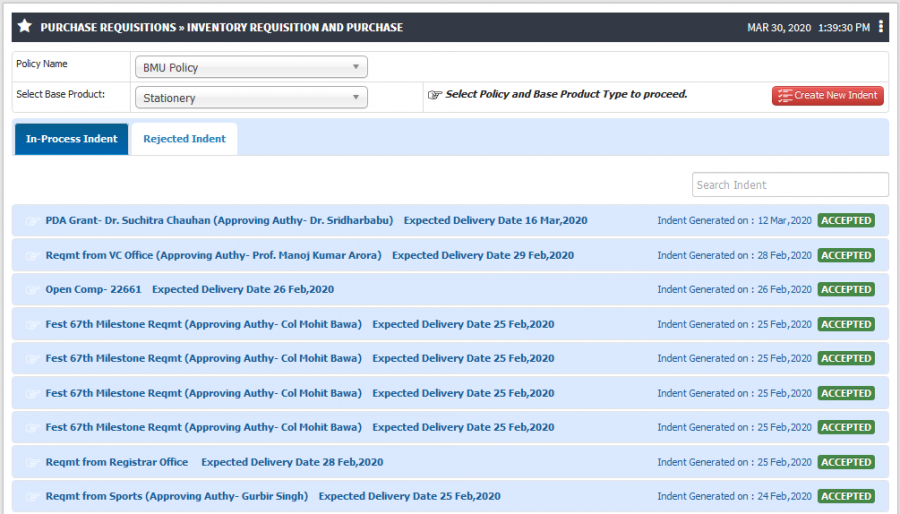
- In process indent will be shown in In-Process Indent tab.
Create New Indent
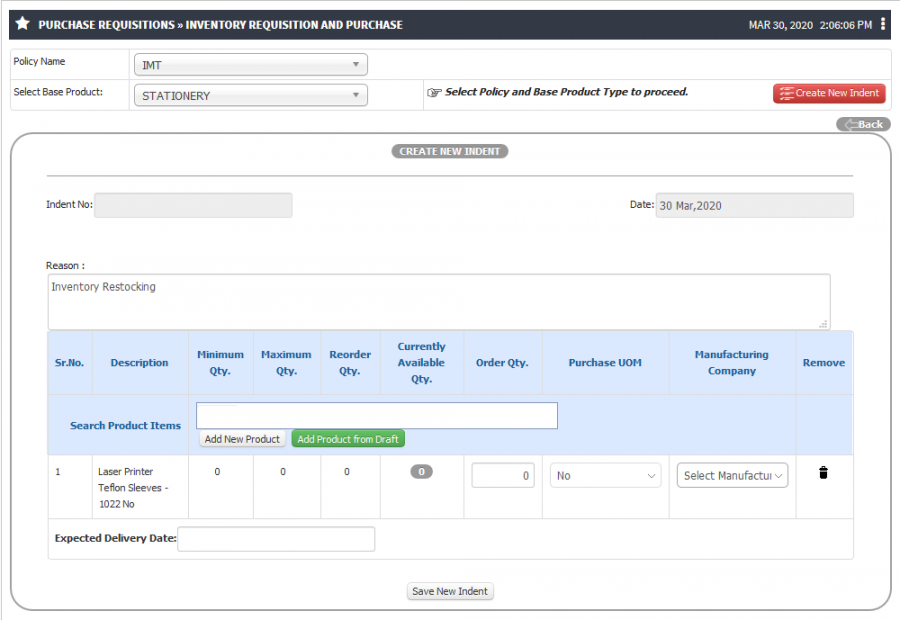
- To create indent first select the base product from the drop down and click on create new indent button.
- To Add product in the indent search the product name in searchable textbox and select the product from the list.
- Enter order Quantity and manufacturing company name for all selected product.
- Enter expected delivery date and save the indent.
Drafted Item
- For purchase indent user have the provision to add product in the draft on Inventory Transaction UI.
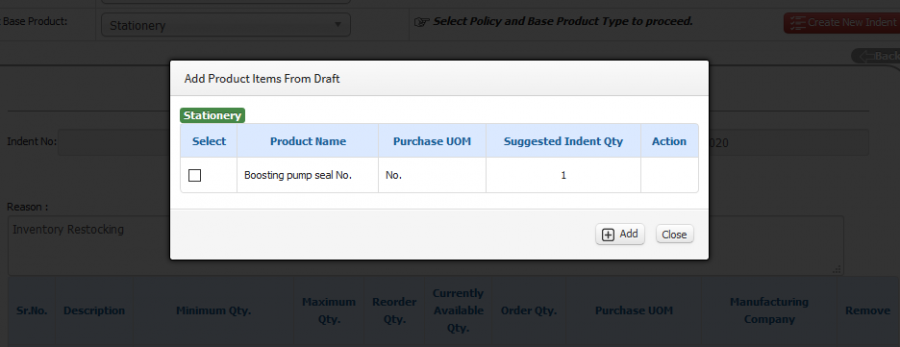
- Already drafted product can be added in the purchase indent.
- To add drafted products click on add product from draft button.
- Select the product which needs to be added in purchase indent and click on add button.
Add new Product
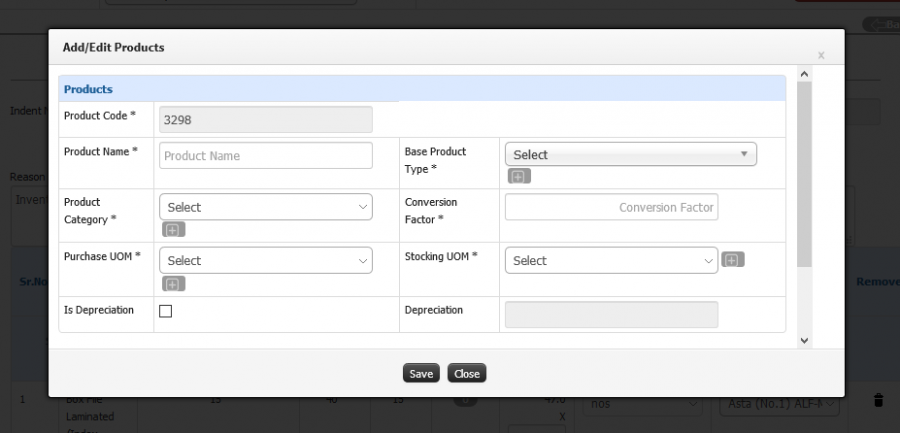
- If any product is not configured in the system then user can directly add product from the same screen instead of going back to the Configuration » Product Add/Search/Edit.
- To add new product in to the system click on Add new product button.
- Fill all the required details and click on save button.
Rejected Indent
- To check the rejected Indent list click on Rejected Indent tab.
- To check the reason of rejection and indent details click on the indent hyperlink.
