Difference between revisions of "Event Design"
From JUNO Wiki
Jump to: navigation, search
(→Functionality) |
(→Step by step) |
||
| Line 22: | Line 22: | ||
Follow Below mentioned steps | Follow Below mentioned steps | ||
| − | * | + | * Add Itinerary |
| + | |||
[[File:Event Design1.png|border|center|frameless|700x700px]] | [[File:Event Design1.png|border|center|frameless|700x700px]] | ||
| + | |||
| + | |||
| + | * Add Resource option | ||
[[File:Event Design2.png|border|center|frameless|900x900px]] | [[File:Event Design2.png|border|center|frameless|900x900px]] | ||
| + | |||
| + | |||
| + | * Option to mark attendance, add student, mark student registration,etc. | ||
| + | |||
[[File:Event Design3.png|border|center|frameless|800x800px]] | [[File:Event Design3.png|border|center|frameless|800x800px]] | ||
| + | |||
| + | |||
| + | * List of session for activities for event | ||
[[File:Event Design6.png|border|center|frameless|900x900px]] | [[File:Event Design6.png|border|center|frameless|900x900px]] | ||
| − | |||
Revision as of 14:47, 7 April 2020
Event Design
Event admin can design event itinerary using event design option. Various session during the tenure of event can be conducted.
Roles
- Event Admin
Path
Event Admin >> Events >> Event Scheduling >> Click on Event >> Event Design
Inputs Needed
- Select Event
Functionality
Event Design
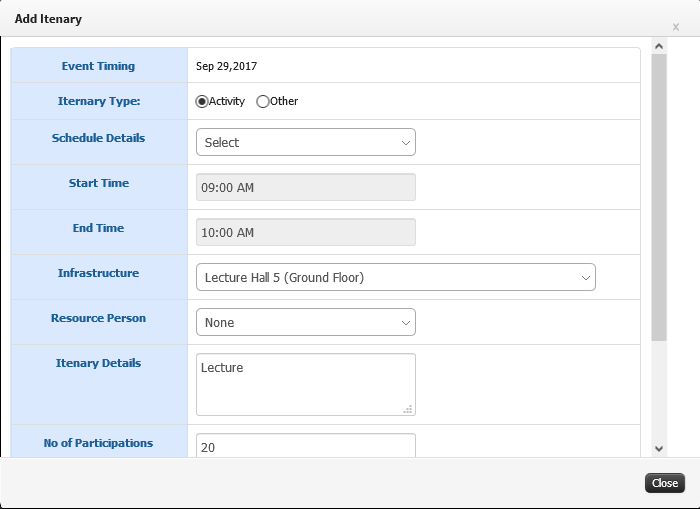
- Option to Add event itinerary.
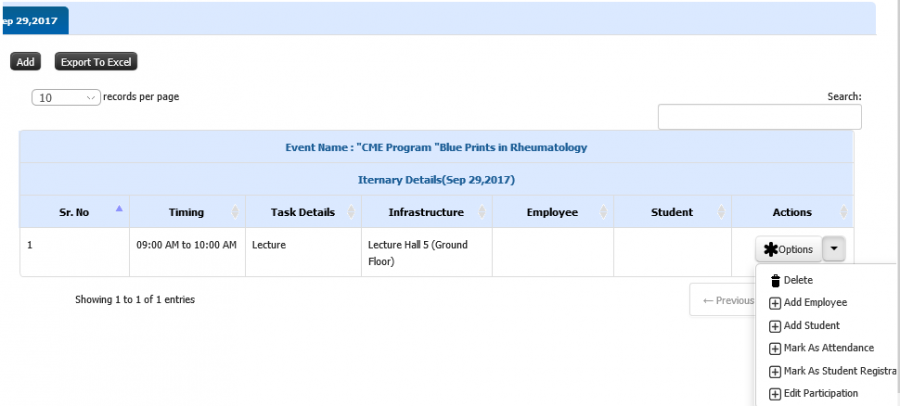
- Allow an user to define itinerary activity, specify participant, infrastructure, mark registration, mark attendance, etc.
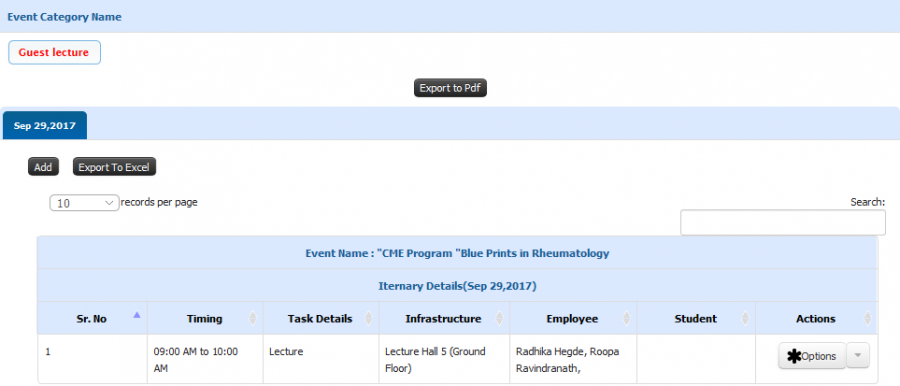
- Designing to event can be done by creating multiple set of activities or session or lectures.
Step by step
Follow Below mentioned steps
- Add Itinerary
- Add Resource option
- Option to mark attendance, add student, mark student registration,etc.
- List of session for activities for event
{"minExpandLevel":2}
- Initial Configuration
- Terminology Used in Initial Configuration
- Basic Structure Creation
- Mappings
- Liaisons
- Master Lists
- Legacy Data Upload
- Initial Data Template
- Employee Data Template
- Student Data Template
- Course Data Template
- Infrastructure Data Template
- Finance Data Template
- Stock/Inventory Data Template
- Library Data Template
- Attendance Data Template
- Grade/Marks Data Template
- Quiz Questions Data Template
- Employee Profile Data Template
- Initial Configuration FAQ
{"minExpandLevel":2}
{"minExpandLevel":2}
{"minExpandLevel":2}
- Admission
- Terminology Used in Admission
- Admission Configuration
- Guideline Configuration
- Departments and Program association
- Entrance exam Configuration
- Admission Quota and Category Configuration
- Admission Document Configuration
- Admission intake configuration
- Admission Eligibility Configuration
- Admission Rounds Configuration
- Merit List Configuration
- Direct Admission
- Admission Process
- Admission Test
- Lead Management
- Admission FAQ
{"minExpandLevel":2}
{"minExpandLevel":2}
- Academics
- Terminology Used
- Program Creation
- Syllabus Pattern Creation
- Syllabus Structure
- Course Outline
- Faculty Course Management
- Student Course Management
- Time Table
- Course File
- Attendance
- Concurrent Assessment
- Outcome Based Evaluation
- Learning Management System(LMS)
- Topic Registration
- Synopsis
- Defining Research Project
- Creating Evaluation Parameter
- Project Guide Configuration
- Synopsis Configuration
- Submission of Synopsis by Student
- Synopsis Approval by Guide
- Synopsis Approval by HOD
- Synopsis Approval by Thesis Department
- Synopsis Approval by Dean Login
- Email Alerts to referee
- Synopsis Approval by Referee Login
- Colloquium
- Thesis
- Defining Research Project
- Creating Evaluation Parameter
- Project Guide Configuration
- Thesis Configuration
- Submission of Thesis by Student
- Thesis Approval by Guide
- Thesis Approval by HOD
- Thesis Approval by Thesis Department
- Thesis Approval by Dean Login
- Thesis Approval by Referee Login
- Referee Report
- Request for Open Defense
- Open Defense Request Approval by HOD
- Open Defense Request Approval by Chair Person
- View Referee & Guide Report
- Final Thesis
- SIP
- On-Line Test Through Course File
- Feedback
- Student Leave
- Mentor Student Module
- Academics FAQ
{"minExpandLevel":2}
- Exam
- Terminology Used in Exam
- Exam Admin Role
- Creating University
- Defining Stream
- Defining Qualification
- Open Electives
- Syllabus and Pattern Creation
- Syllabus and Subject
- Term Exam Structure
- Exam Duty Configuration
- SMS and e-Mail Pattern Configuration
- Result Reference Key Configuration
- Exam Center Code Configuration
- Exam Schedule Configuration
- Exam Configuration
- Paper Valuer
- Answer Sheet Correction Allocation
- Exam Form Notification
- Student Exam Form
- Hall Ticket Generation
- Exam Paper Finalization
- Exam Invigilator
- Exam Hall Attendance
- Grace Policies
- Internal - External Marks Entry
- Spot Evaluation Marks Entry
- Internal Exam Marks
- Vocational Subject Marks
- Forward Marks for Result Processing
- Grace Calculation
- Process Result
- Marks Moderation
- Result Processing and Totaling
- Student Exam Dashboard
- Legacy Marks Entry
- Internal Exam Configuration
- Internal Subject Allocation
- Internal Subject Marks
- Faculty Role
- Student Role
- Exam FAQ
{"minExpandLevel":2}
- Finance
- Terminology Used in Finance
- Budget
- Defining Budget Title
- Defining Groups and Subgroups and Ledgers
- Associating Employees with Ledgers for Budgetary Estimates
- Budget Estimates by Employees
- Scrutiny and Revision of Budget by Finance Admin
- Finalizing and Freezing Budget Amounts
- Notification to Employees on Budgeted amounts
- Budgetary Alerts
- Budget Variance
- Fees
- Terminology Used in Fees
- Academic Fees Structure
- Fee Components
- Fee Amount corresponding to Quota and Category
- Sponsorship Bodies
- Fees Installments
- Part Payments
- Fee Advances
- Fee Refund
- Late Fees
- Admission Cancellation
- Invoices and Receipt
- Scholarship
- Sponsorship
- Hostel Fees
- Transport Fees
- Exam Fees
- Library Fees
- Miscellaneous Fees
- Fines
- Fees FAQ
- Salary
- Salary Configuration
- Employee Salary Parameter Mapping
- Employee Salary Adjustments
- TDS Configuration
- TDS Calculation
- Salary Calculations
- Leave Availing Rules
- Arrears Configuration
- Arrears Calculation
- Employee Account Details
- Employee Salary Payable
- Employee Salary Transfer
- Visiting Faculty Payable
- PF
- ESIC
- Insurance
- Gratuity
- Leave Encashment
- LTA
- Medical Reimbursement
- Monthly Reports
- Yearly Reports
- CTC
- FnF
- Purchase/Vendor Accounting
- Sales/Client Accounting
- General Accounts
- Investment Management
- Endowment Management
- Employee Society
- Finance FAQ
{"minExpandLevel":2}
- HR
- Terminology Used in HR
- Recruitment
- Terminology used in recruitment
- Recruitment Liaison
- University Post Configuration
- Recruitment Process
- Recruitment Liaison Disclaimer
- Recruitment Liasoning Finance Association
- Office Document Configuration
- Recruitment Test Configuration
- Applicant Employee registration
- Log Report
- Registered Applicant Employee
- Applicant Employee Profile Report
- Applicant Employee Referenced Detail
- Applicant Employee Documents
- Call for GD/PI
- GD or PI Marks
- Call For Interview
- Offer Letter
- Joining Report
- Service Book
- Service Book
- Muster
- Muster Policy Creation
- Employee Worktime
- Working Hours
- Biometric Devices
- Fingerprints
- Daily Attendance Report
- Monthly Muster Report
- Muster Freezing
- Input for Salary Calculation
- Leave Deductions
- Late coming and Early going
- Consolidated Attendance Report
- Muster Incomplete Task
- Missed Punch Request
- Request for waive off short day
- Leave
- Salary
- Salary Configuration
- Employee Salary Parameter Mapping
- Employee Salary Adjustments
- TDS Configuration
- TDS Calculation
- Salary Calculations
- Leave Availing Rules
- Arrears Configuration
- Arrears Calculation
- Employee Account Details
- Employee Salary Payable
- Employee Salary Transfer
- Visiting Faculty Payable
- PF
- ESIC
- Insurance
- Gratuity
- Leave Encashment
- LTA
- Medical Reimbursement
- Monthly Reports
- Yearly Reports
- CTC
- FnF
- Employee Profile
- Personal Details
- Family Details
- Medical Details
- Qualification
- Subject Taught
- Training
- Conference/Seminar/Conclave
- Workshop
- Publications
- Consultancy
- Research Project
- Research Guidance
- Membership
- Patents/Copyrights
- Skill Upgradations
- Research Interest
- Significant Achievement
- Other Contributions
- Appointment Status
- Service Book
- Self Contribution/Addl.Responsibilities
- Foreign Collaboration
- Brief Profile
- Appraisal
- Grievance
- Contractual Appointment
- Resignation
- No Dues
- Full and Final Settlement
- HR FAQ
{"minExpandLevel":2}
- Procurement and Stores
- Terminology Used in Procurement and Stores
- Infrastructure
- Maintenance
- Stock
- Product Search/Edit
- Dead Stock Configuration
- Dead Stock Register
- Stock Allocation
- Infrastructure Incharge Allocation
- Employee Seating Arrangement
- Vendors
- Vendor Feedback
- Marketing Company
- Gate Pass
- Good Receipt Note (GRN)
- Generate Work Order
- Internal Maintenance Report
- External Maintenance Report
- Stock Reports
- Employee Login(Stock)
- Stock FAQ
- Inventory
- Purchase
- Abbreviations
- Add Vendor
- Vendor Registration Configuration
- Vendor Approval
- Vendor Feedback
- Add Base Product
- Product Search/Edit
- Purchase Requisition Authority
- Purchase Authority
- Signature Authority
- Purchase Requisitions
- Generate Requisition
- Generate Purchase Order Without RFQ
- Request for Quotations
- Add Quotation
- Quotation Opening
- Quotation Analysis
- Quotation Configuration
- Approved Rate Contracts
- Tender Configuration
- Tender
- List of Purchase Orders
- Purchase Order Clauses
- Add Delivery Challan
- Add Invoice
- Purchase Payment Request
- Reports
- Vendor Login
- Employee Login
- Student Login
- Finance Login
- Purchase FAQ
{"minExpandLevel":2}
- Research
- Terminology Used in Research
- Employee Research Contribution
- Funded Research Project
- Research Courses
- Admission
- Assessment
- Synopsis
- Defining Research Project
- Creating Evaluation Parameter
- Project Guide Configuration
- Synopsis Configuration
- Submission of Synopsis by Student
- Synopsis Approval by Guide
- Synopsis Approval by HOD
- Synopsis Approval by Thesis Department
- Synopsis Approval by Dean Login
- Email Alerts to referee
- Synopsis Approval by Referee Login
- Thesis
- Defining Research Project
- Creating Evaluation Parameter
- Project Guide Configuration
- Thesis Configuration
- Submission of Thesis by Student
- Thesis Approval by Guide
- Thesis Approval by HOD
- Thesis Approval by Thesis Department
- Thesis Approval by Dean Login
- Thesis Approval by Referee Login
- Referee Report
- Request for Open Defense
- Open Defense Request Approval by HOD
- Open Defense Request Approval by Chair Person
- View Referee & Guide Report
- Research FAQ
{"minExpandLevel":2}
{"minExpandLevel":2}
{"minExpandLevel":2}
- Internal Communication
{"minExpandLevel":2}
- Committees
- Terminology Used in Committees
- Add Committee Details
- Update Details
- Committee Member
- Committee Responsibility
- Committee Meeting
- Agenda Creation
- Approve Agenda
- Send for Notification
- MOM Tracking
- MOM Approval
- MOM Sharing
- Announcement
- Event
- Meeting Attendance
- Committee Institute Mapping
- Committee Document Verification
- Budget
- HR request Generation
- Alert to Principal/HR/Director
- HR Approval
- Committee Approval
- Committee Agenda
- Committees FAQ
- Terminology Used in Committees
{"minExpandLevel":2}
{"minExpandLevel":2}
{"minExpandLevel":2}
- Hostel
- Terminology Used in Hostel
- Hostel Configuration
- Hostel Admission
- Hostel Allocation
- Registration Approval
- Generation of Merit List
- Student Parent Contact Details
- Generation of I-Card
- Mess Allocation
- Stock Allotment
- Room Transfer/ Cancellation
- Occupant Search
- Occupant Attendance
- Leave/Night-out Request
- Fine Imposition
- Group Fine
- Guest House
- Guest Room Request Approval Configuration
- Guest Room Booking
- Guest Room Approval
- Hostel Complaint and Maintenance
- Hostel and Related Reports
- Hostel FAQ
{"minExpandLevel":2}
Retrieved from "http://wiki.juno.org.in/index.php?title=Event_Design&oldid=2759"


