Difference between revisions of "Student Applicant Login"
(-) (Tag: Visual edit) |
(-) (Tag: Visual edit) |
||
| Line 1: | Line 1: | ||
== '''Roles''' == | == '''Roles''' == | ||
| − | + | Applicant | |
=='''Path''' == | =='''Path''' == | ||
| − | + | Registration URL | |
== '''Functionality''' == | == '''Functionality''' == | ||
* Admission module effectively manages admission through merit, entrance exam or a government regulated agency. It’s features include course specification, intake for each course, no. of shifts, seat division, eligibility, merit and merit per se, fee structures, revisions, concessions and sponsorship on fee for different category of students, admission cancellation policies, late fee policy and integration with finance module. | * Admission module effectively manages admission through merit, entrance exam or a government regulated agency. It’s features include course specification, intake for each course, no. of shifts, seat division, eligibility, merit and merit per se, fee structures, revisions, concessions and sponsorship on fee for different category of students, admission cancellation policies, late fee policy and integration with finance module. | ||
* To take admission student have to registered using link which is generated at the time of admission configuration. | * To take admission student have to registered using link which is generated at the time of admission configuration. | ||
| − | * Using that link registration has to be done then only applicant login will created | + | * Using that link registration has to be done then only applicant login will created and further admission process can move on. |
== '''Step by Step''' == | == '''Step by Step''' == | ||
| − | * Go to application form link | + | * Go to application form link. Fill all the details and click on register button. |
| − | + | * User will get the username and password in his mobile number. so that he can login whenever he wants and can check other details. [[File:Go to application form link.png|frame|center| ]] | |
| − | * Applicant login | + | * Once the student registered successfully, Applicant login will be Created. |
| − | * | + | * After registration application form will open as per admission configuration and student can able to fill the form details. |
| − | * Fill all details in | + | * Fill all details and save in each tab of application form. |
[[File:Applicant login.png|frame|center]] | [[File:Applicant login.png|frame|center]] | ||
| − | * After filling data in all tabs. User | + | * After filling data in all tabs. User can see the preview of the application form. |
| + | * Student can verify the details and processed for payment. | ||
[[File:Payment .png|frame|center]] | [[File:Payment .png|frame|center]] | ||
| − | * After | + | * After successful payment, applicant can download the application form PDF and application fee receipt. |
[[File:Application Form.png|frame|center]] | [[File:Application Form.png|frame|center]] | ||
Revision as of 13:46, 15 April 2020
Contents
Roles
Applicant
Path
Registration URL
Functionality
- Admission module effectively manages admission through merit, entrance exam or a government regulated agency. It’s features include course specification, intake for each course, no. of shifts, seat division, eligibility, merit and merit per se, fee structures, revisions, concessions and sponsorship on fee for different category of students, admission cancellation policies, late fee policy and integration with finance module.
- To take admission student have to registered using link which is generated at the time of admission configuration.
- Using that link registration has to be done then only applicant login will created and further admission process can move on.
Step by Step
- Go to application form link. Fill all the details and click on register button.
- User will get the username and password in his mobile number. so that he can login whenever he wants and can check other details.
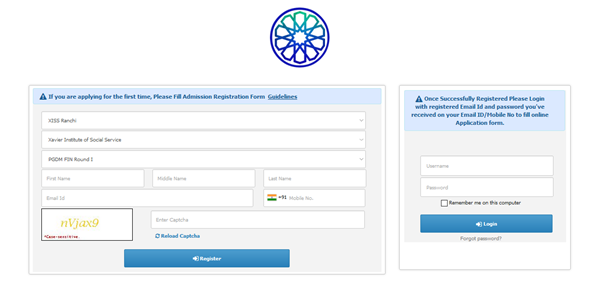
- Once the student registered successfully, Applicant login will be Created.
- After registration application form will open as per admission configuration and student can able to fill the form details.
- Fill all details and save in each tab of application form.


- After filling data in all tabs. User can see the preview of the application form.
- Student can verify the details and processed for payment.

- After successful payment, applicant can download the application form PDF and application fee receipt.
